If you’re ready to replace your roof, it’s important to understand the process so that everything goes smoothly. It also helps to know what materials are best for your home and which contractors will work with you. Read on to learn more.

The first step is to remove the old roof. You’ll want to make sure that you move any vehicles or landscaping that may be near the house so they don’t get damaged during the removal process.
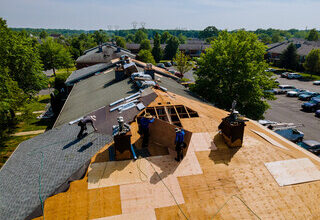
Roof trusses are prefabricated timber frames that provide structural support for the roof sheathing, underlayment, and shingles. These types of frames are often used in residential and commercial construction, saving time and money.
The most common type of truss is the parallel chord or raised heel truss. This type of roof truss provides structural support for the roof and also creates an effective vapour barrier, preventing condensation problems.
It can also help reduce heat in the home and cool down the interior. The trusses can be made from wood or metal.
A typical truss structure consists of top and bottom chords, internal web members, and steel connector plates at every junction to connect the timbers together. The webs transfer the compression and tension forces from the top and bottom chords, while the steel plates are used to support the loads throughout the truss.
For a safe and secure installation, use a crane to lift the trusses into place. The trusses should be laid flat and suitably supported before being lifted into place.
To install a truss, it is important to measure and cut the timbers correctly. This will ensure that the truss is exactly the size it should be and that the joints between the members are secured correctly.
Once all the trusses are ready, they should be installed with temporary horizontal bracing along the rafters and ceiling tie members. These temporary braces will only be in place for a short period of time, so make sure that they are secure and fixed properly.
After the trusses are set and temporarily braced, it is time to fix permanent diagonal bracing to each truss at 45 degrees. Nail the bracing to the wall plate at the lower end, and then nail them as high up on the first truss as possible, leaving room for the apex brace later on.
Before removing the temporary bracing, check that there are no obvious defects in the material, such as knots, splits, or rotting timber. If there is, the material must be inspected and removed to avoid any further damage.
Fascia installation is an important part of your roof’s construction. It helps protect the house from moisture and keeps your gutters clean. It also gives your home a finished look and can enhance your curb appeal.
The fascia is a long, straight board that runs along the lower edge of the roof. It connects directly to the roof rafters and serves as the mount for your gutters. If your roof has clogged gutters or an animal infestation in the attic area, you might notice water damage to your fascia. If this is the case, you may want to consider replacing it with a new one.
Your fascia can be made of wood, PVC, aluminum, or vinyl. Its material determines how durable it is and what color it will be. You can also choose to have the fascia board pre-finished in a color that matches your home’s siding.
When installing your fascia boards, be sure to use a ladder and follow the proper safety precautions. Never stand on the top step of the ladder since you could be injured in an accident. Always have a buddy to help you out in case you need assistance.
If you’re installing your own fascia, be sure to measure the length of your roof before you begin. This will ensure that you don’t waste time and money. Once you have your measurements, cut the boards to the appropriate length and secure them to the rafters.
You should also take note of any holes in your fascia. Holes can cause moisture to enter your attic and lead to other problems with your roof. If you notice a hole in your fascia, contact a roofing contractor as soon as possible.